Monday, March 21, 2011
Case Study 3 - The Horrible DPI Mistake
Here's the scenario - a print shop/graphics designer/magazine asks a client for a photo at 300 dpi. They wish to print it out 7" x 5". The client already has a beautiful digital photo with pixel dimension of 2048 x 1536. The client notices that the photo editing software is showing that the photo is set to 72 dpi. So, following orders, the client types in 300 to reset the dpi to 300. In doing so the image is resampled and is enlarged over 4 times to pixel dimensions of 8533 x 6400. The client sends this enlarged 300 dpi photo. The print shop/graphics designer/magazine rejects it (too grainy, too colour blotched). The client is crushed.
The sad thing is that the client already had the perfect photo (2048 x 1536 @ 72 dpi) which would have been beautifully printed at 7" x 5" ( at 292.6 PPI). The print shop / graphics designer /magazine didn't know what they really wanted. - READ WHAT PRINT SHOP REALLY WANT and the client didn't know how to change the DPI without resizing the image to give the print shop what they mistakenly think they need - READ HOW TO CHANGE THE DPI..
The sad thing is that the client already had the perfect photo (2048 x 1536 @ 72 dpi) which would have been beautifully printed at 7" x 5" ( at 292.6 PPI). The print shop / graphics designer /magazine didn't know what they really wanted. - READ WHAT PRINT SHOP REALLY WANT and the client didn't know how to change the DPI without resizing the image to give the print shop what they mistakenly think they need - READ HOW TO CHANGE THE DPI..
_________________________________________________________________
Peoples are always confused when deal with photo’s pixels, DPI and actual size. These are actually 3 properties/parameters that go into determining the resolution of a graphic.
Pixels: The exact number of 'dots' both horizontally and vertically that make up the file. This is the actual resolution of the file or the actual image size. The actual pixel is finite in a bitmapped file.
DPI (Dots per inch): The number of 'dots' or pixels per each inch of a printed or scanned document.
Actual size: The actual size is the physical size of a printed image or a scanned item.
These three properties have direct effect on one another. With any 2 of the properties you will get the third. Their relationship is stated in below formula:
Actual size = Pixels/DPI
If you look at the Image Size Menu in Photoshop you can see a little easier how these relate.
We can find out the size of our printing from above formula if needed. For example, if you have a 100x100 pixel image that is being printed at 100 DPI, the image would then be 1 inch by 1 inch when printed. If you have a 300x300 pixel image being printed at 100 DPI, the image would then be 3 inches by 3 inches when printed. If you had an image that was 300x300 pixels being printed at 300 DPI, it would print at 1 inch by 1 inch.
Many people think DPI is all that matters. They couldn't be more wrong! A person creating graphics for print often says "I need it at 300 DPI." That really doesn't tell us much. At least 2 properties that we mentioned above, i.e. DPI and Pixels, DPI and Size, or Pixels and Size have to be specified in order to output an image as required. For example, if I am scanning something that is 2" x 2" and I scan at 300 DPI, I will get an image that is 600 x 600 pixels. If my original was 8" x 10", I will get a result of 2400 x 3000 pixels. So if the person asking for 300 DPI also added that this image (when printed) will be 2" by 2", then we can do the math! We know that they want a final resolution of 600 x 600 pixels! We can do the math when we scan based on the size of the original.
As described in Case Study 3, the print shop/graphic designer/magazine ask a client for a photo at 300 dpi which they will use to print it out at 7” x 5”. So, they are actually asking for a photo which is in 2100 x 1500 pixels resolution. The client already has a good photo which is 2048 x 1536 pixels that able to fit the requirement with physical image size at 6.8 x 5.1 inches in 300 DPI.
2048 pixels / 300 dpi = 6.8 inches
1536 pixels / 300 dpi = 5.1 inches
The mistake happened when the requirement is not explain clearly to the client or due to the lack of understanding on dpi.
As we know, digital camera is the most common device that we use to create digital image. The resolutions of cameras are ranged from 10M to 21M in current market. A 10M camera can create a digital image in resolution 3872 x 2592 pixels whereas a 21M camera can create a digital image in resolution 5634 x 3753 pixels. Since the quality of a photo is mainly defined by the pixels, the DPI setting of a camera is actually meaningless. However, most of the cameras are set to 72 dpi since that is the original "screen resolution" of computer monitors. So, the digital photo of the client shall be created with a 3M camera since the image is 2048 x 1536 pixels @72 dpi. In order to fulfill the requirement of 300 dpi, the client chooses to resample the photo by changing DPI of photo directly from 72 to 300 with his photo editing software. However, with this resample, the pixel of the photo was enlarged by 4 times which we see a resolution of 8533 x 6400 now.
Most of the digital photos don't take well to this amount of enlargement without special techniques. So, grainy and color blotched was observed by the print shop and the photo is rejected.
What should the client do now? As we understand from above analysis, the resolution of existing photo is able to fit the requirement. He can just send the original photo to the print shop/graphic designer/magazine. Else, he can edit the photo with his photo editing software without resample after he change the DPI to 300 dpi.
Adobe Photoshop Method
- Load your image into Adobe Photoshop (or Photoshop Elements).
- Select the "Image > Image Size" menu option (may be "Image > Resize > Image Size" in Photoshop Elements).
- In the image size dialog window, deselect the "Resample Image" checkbox (make sure there is no checkmark in that box).
- In the "Resolution" box type in 300 (or whatever DPI you want)
- Click the "OK" button
- Your image DPI has now been set to whatever you want (leaving the pixel dimensions of the image unchanged).
- Save this photo.
Sunday, March 13, 2011
Step 1: Create Image Stack; Auto and Step 2: Auto Blend Layers: Crop
The Auto-align layer and auto-Blend layers is for creating seamless collages of a single scene where certain elemenent change their position within the setting.
i) create an image stack ( either manually or by using the stack script) .
ii) Click on on of the layers to designate it as reference for the aligment.
iii) Then, Shift-click on the other layer and select it. Choose Edit > Auto -align Layers. In the dialog, choose Auto.
Now Choose edit > Auto Blend Layers.
Select the crop tool to crop uneven edges.
Saturday, March 12, 2011
Kesan Khas menerusi penggunaan Filter
Adobe photoshop menyediakan satu kemudahan yang dikenali sebagai filter atau penuras. Filter ini boleh digunakan bg menghasilkan suatu fail imej yg mempunyai pelbagai kesan khas atau efek seperti BLUR,SHARPEN,FIRE dan sebagainya.
Tuesday, March 8, 2011
Pengklonan Imej menerusi Kemudahan Clone Stamp
 Ikon Clone Stamp tool merupakan antara kemudahan yg paling tepat digunakan bg menghasilkan klon sesuatu objek atau imej. Dengan menggunakan ikon ini kita dpt satu salinan pendua atau klon bg objek yg diperlukan.
Cth:
i) Buka fail imej yang berkaitan.
 |
| kapal |
 |
| Belon |
So,kita akan buat klon dimana imej belon akan berada didalam gmbr kapal layar...
Note: Proses pengklonan imej hanya akan berfungsi sekiranye kedua-dua imej tersebut berada di dlm imej mode yg same ( RGB dgn RGB misalnye..). Imej yg disimpan dlm mod index color tidak boleh digunakan.
Monday, March 7, 2011
Pelbagai Teknik dan Penggunaan Kesan Khas dlm penghasilan Grafik
Menentukan Fokus Imej Menerusi Kemudahan Blur,Sharpen dan Smudge.
Ikon Blur Tool : Utk mengkaburkan bahagian tertentu pada imej.
Ikon Sharpen tool : Digunakan utk menajamkan sesuatu kawasan pada imej agar kelihatan lebih tertumpu
Menggunakan Ikon Blur Tool - Bokeh!
Ikon Blur Tool : Utk mengkaburkan bahagian tertentu pada imej.
Ikon Sharpen tool : Digunakan utk menajamkan sesuatu kawasan pada imej agar kelihatan lebih tertumpu
Menggunakan Ikon Blur Tool - Bokeh!
 |
| Imej sebelum |
 |
| Imej selepas di Bokeh! |
Saturday, March 5, 2011
why... we should use level/curve instead of brightness and contrast... ??
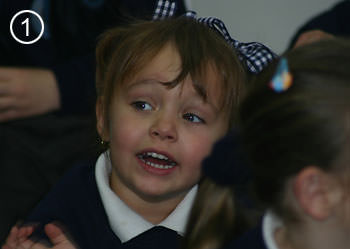
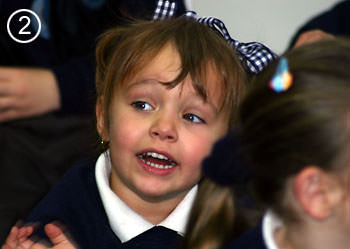
Brightness and Contrast
Very often, when we upload our pictures to the computer from the camera and first look at them on the screen, they will appear dull and lifeless like photo No.1 on the right.In this instance the photo is under exposed, often a problem when auto flash is used with a long lens, the flash is too far away from the subject to give the proper exposure.
Here are some suggestions for altering the brightness and contrast of the image in Photoshop, use them in the order that they appear, only move on to the next method if you are not getting what you want.
Auto Levels/Contrast
There is a 'magic button' in Photoshop called 'auto levels' which you will find under the 'image' menu on the 'adjustments' sub menu.Hitting 'auto levels' is always worth a try, it sometimes produces just the result you were looking for or, at least, a good place to start. If you don't like the result then hit the undo button on the edit menu and move on to plan B. Hitting the 'auto levels' button in this case produced photo No.2, which is not too bad.
If you tried 'auto levels' and liked the overall brightness and contrast but the color balance was worse than before then try 'auto contrast' instead. This does the same job as 'auto levels' but without altering the color.
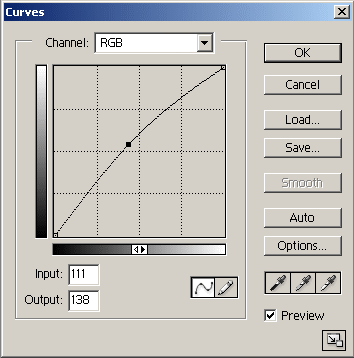
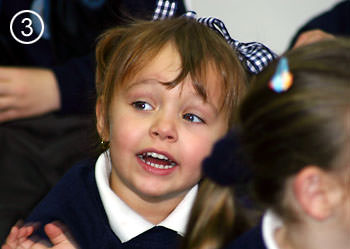
Curves
Sometimes though, the auto buttons won't give us what we want, so we need to try something that we can control ourselves. The next weapon in the arsenal is 'curves'. Select 'curves' from the 'image->adjust' menu and we get the window below. It may look a little intimidating at first but it is quite easy to use.Keep the channel set on RGB to adjust all the colors at once, don't try and use this window for balancing color as there are easier ways of doing it.
When the window is first opened there will be a straight diagonal line running from the bottom left to the top right of the grid. Put your cursor on the diagonal line and a black point will appear, drag this point diagonally upwards and to the left. Look at your picture and you will notice that the mid tones of your picture are getting lighter giving you a brighter looking picture. Pull to the right and downwards and you will see the mid tones getting darker.
Used carefully this is a very powerful tool indeed but it is best used sparingly, pull the curve too much and you will get all kinds of weird effects. I often use this tool several times in succession on the picture to drag the mid tones out of the mud.
If you have extreme work to do then you can move the end anchors to change the point at which the shadows go black or the highlights go white, but normally it is best to leave these anchors where they are.
In the 'curves' window pictured above you will see I have made a small adjustment to the curve to lighten the mid tones of the photo. The result of this adjustment is shown below in photo No.3.
Brightness & Contrast
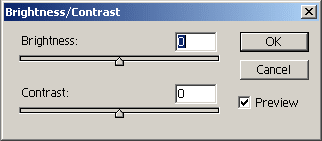
Sometimes the adjustment of these two controls can give you a better result than 'curves' but it is also easier to mess things up as well so I suggest you only use them when all else fails. You may need to use this window if, for instance, your picture needs to be brighter and it needs more contrast.
Levels
A better way to make linear adjustments is to use the 'levels' window.
Friday, March 4, 2011
Week 9 - Membina Kawasan Pilihan bg tujuan penyuntingan imej - Cartoon activity
Dalam bab ni overall adalah mengenai penggunaan selection tools, iaitu pemilihan kawasan seperti Ikon Marquee tool, Lasso Tool dan juga Magic Wand Tool. Di dalam projek ini juga, kita akan mengguna kan ikon2 tersebut bagi menghasilkan satu imej baru hasil dari gabungan imej2 asas yang lain.
Contoh:
5. Ubah imej menjadi seperti dibawah dgn menggunakan ikon Move tools.
Cube dgn ikon Magic Wand Tool dan juga Ikon Lasso Tool..! Selamat Mencuba..!
Contoh:
Menjadi seperti dibawah....
Langkah-langkah:
a) Penggunaan Ikon Rectangular Marquee Tool
1. Buka Fail Toy story.
2. Dgn menggunakan icon "Rectangular Marquee Tool" buat selection pada kotak teks "TOY STORY 2".
3. Seterusnya gunakan arahan SELECT > DESELECT bg membuang kawasan pilihan.
Hasil adalah seperti rajah 1.
4. seterusnya gunakan arahan Images > Canvas Size. Tukar kepada 600 pixels. Tujuan utk memperbesarkan ruangan kerja yang lebih besar.5. Ubah imej menjadi seperti dibawah dgn menggunakan ikon Move tools.
Cube dgn ikon Magic Wand Tool dan juga Ikon Lasso Tool..! Selamat Mencuba..!
Subscribe to:
Comments (Atom)


